240711 Jobs+Burst在风场粒子特效中的实践
准备一个简单的风场粒子材质
编写hlsl
新建WindFunc.hlsl脚本。由于Unity中并没有新建hlsl脚本选项,可以随意新建一个Shader脚本,改名为WindFunc.hlsl,然后将其中内容替换为:
#if defined(UNITY_PROCEDURAL_INSTANCING_ENABLED)
            StructuredBuffer<float4x4> _Matrices;
#endif

void ConfigureProcedual()
{
#if defined(UNITY_PROCEDURAL_INSTANCING_ENABLED)
                unity_ObjectToWorld=_Matrices[unity_InstanceID];
#endif
}

void WindFunc_float(float3 In, out float3 Out)
{
    Out = In;
}
void WindFunc_half(half3 In, out half3 Out)
{
    Out = In;
}
使用ShaderGraph
在Project中新建Shader Graph/URP/Unlit Shader Graph,命名为WindGraph。
在WindGraph面板中单击右键Create Node/Input/Geometry/Position,创建一个Position结点,将Space由World改为Object。
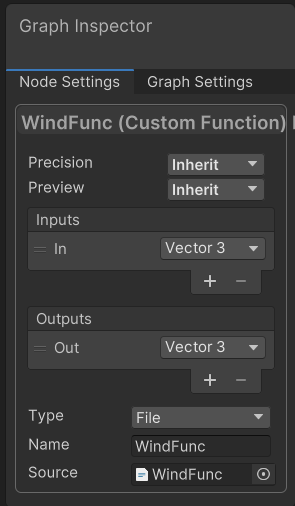
在WindGraph面板中单击右键Create Node/Utility/Custom Function,创建一个Custom Function结点,选中它,在Graph Inspector面板中将Source替换为WindFunc,在Name栏中填写WindFunc,然后分别点击Inputs、Outputs下方的“+”,在下拉框中找到Vector3。
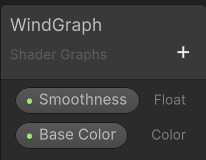
点击WindGraph面板的“+”,选择Float,命名为Smoothness,选中它,在Graph Inspector面板中将Mode由Default改为Slider,然后再次点击WindGraph面板的“+”,选择Color,命名为Base Color,选中它,在Graph Inspector面板中将Mode由Default改为HDR。
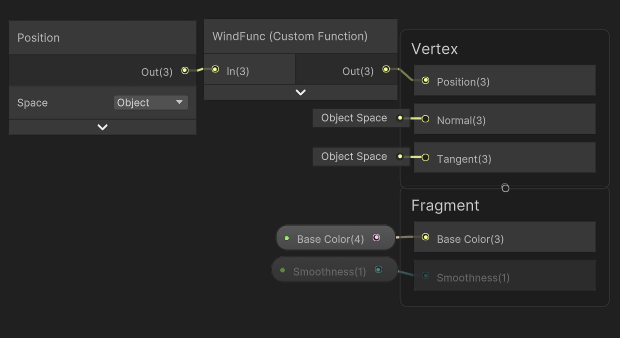
右键单击Fragment,Add Block Node/Smoothness,按下图方式连接,点击左上角的Save Asset。
创建材质
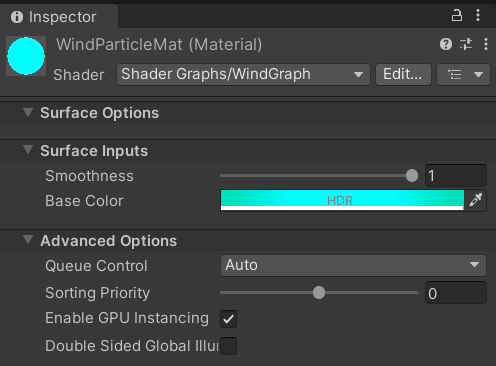
在Project中新建Material,命名为WindParticleMat,选中它,在Inspector面板中将Shader更改为Shader Graphs/WindGraph,将Surface Inputs中的属性更改为你喜欢的样子,勾选Enable GPU Instancing,我们的材质就准备好了!
制作一个简单的风场粒子特效
编写C#脚本
新建WindParticle.cs脚本,删除其中的Start与Update方法。
在编辑器中,我们想要设置粒子的生成时间间隔、运动速度以及形状,指定粒子的网格和材质,故定义:
[SerializeField] private float interval = .2f;
[SerializeField] private float velocity = 1f;
[SerializeField] private Vector2 shape = new Vector2(2, .1f);
[SerializeField] private Mesh mesh;
[SerializeField] private Material mat;
对于一个粒子,我们需要知道它的生命周期与运动方向,故定义:
private float lifespan;
private Vector2 orient;
同时定义OnEnable方法,在其中初始化:
private void OnEnable(){
    lifespan = transform.localScale.x / velocity;
    orient = new Vector2(
        Mathf.Cos(transform.rotation.eulerAngles.z * Mathf.Deg2Rad),
        Mathf.Sin(transform.rotation.eulerAngles.z * Mathf.Deg2Rad)).normalized;
}
对于风场中的所有粒子,我们需要知道它们的位置、形状和数量,想要绘制这些粒子,我们又需要包含它们位置、旋转和形状信息的矩阵,故定义:
private int cnt;
private Vector3[] pos;
private Vector3[] scales;
private Matrix4x4[] matrices;
并在OnEnable方法中初始化:
cnt = Mathf.CeilToInt(lifespan / interval);
pos = new Vector3[cnt];
scales = new Vector3[cnt];
matrices = new Matrix4x4[cnt];
for (int i = 0; i < cnt; i++) scales[i] = Vector3.zero;
在粒子的初始化阶段,我们需要得知每一个粒子的初始化时机,还有当前正在初始化的粒子序号,粒子的初始化需要一个包含风场的位置、旋转和形状信息的矩阵,故定义:
private int idx;
private float timer;
private Matrix4x4 windMatrix;
并在OnEnable方法中初始化:
idx = 0;
timer = 0;
windMatrix = Matrix4x4.TRS
    (transform.position, transform.rotation, transform.localScale);
然后定义InitParticle方法,用于初始化单个粒子:
private void InitParticle()
{
    pos[idx] = windMatrix.MultiplyPoint(Vector3.left / 2 +
        Vector3.Lerp(Vector3.up, Vector3.down, UnityEngine.Random.Range(.25f, .75f)));
    scales[idx] = shape * UnityEngine.Random.Range(.25f, 1);
}
再定义OnFixedUpdate方法,在其中定时调用InitParticle方法:
private void FixedUpdate()
{
    timer += Time.fixedDeltaTime;
    if (timer > interval)
    {
        timer = 0;
        InitParticle();
        idx = (cnt + idx + 1) % cnt;
    }
}
接下来需要定义Update方法,实时计算粒子的位置,绘制在屏幕上:
private void Update()
 {
     for (int i = 0; i < cnt; ++i)
     {
         pos[i] += Time.deltaTime * velocity * (Vector3)orient;
         matrices[i] = Matrix4x4.TRS(pos[i], transform.rotation, scales[i]);
         Graphics.DrawMesh(mesh, matrices[i], mat, 0);
     }
 }
创建预制体
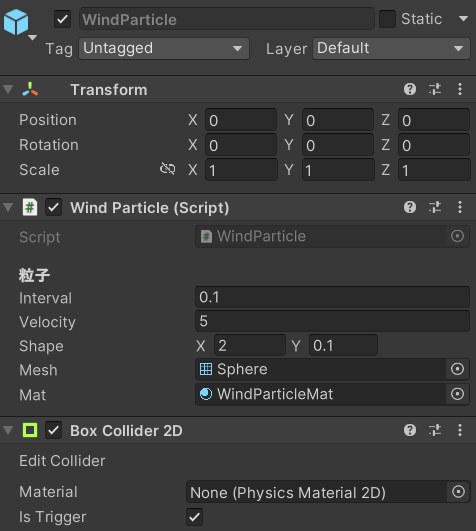
保存脚本,新建Prefab,命名为WindParticle,将这个脚本添加上去,指定Mesh为Sphere,Mat为WindParticleMat,设置至少看起来合理的数值,再添加BoxCollider2D组件(留作实现风场用,也能省去Gizmos标识范围的功夫),勾选IsTrigger,一个简单的风场粒子特效就制作好了!
预览
请我的策划朋友搭了个关卡,效果如下:

“能跑,”我的策划朋友说,“就是有点卡。”这究竟是怎么回事呢?
性能
进入Play Mode,在Game视窗中点击右上角的Stats,可以看到当前的帧率等信息:
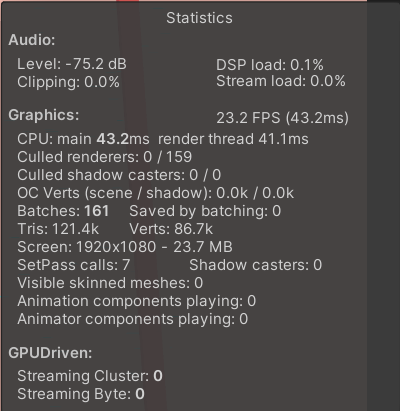
可以看到,帧率竟然在24上下浮动,对于一部游戏来说十分甚至九分的糟糕。看来我的策划朋友讲话还是客气了点。如果我们并不刻意追求“电影感”,就得着手优化了。
优化这个简单的风场粒子特效
减少Draw Call
注意到这么几个粒子处理批次(Batches)竟高达161,我们首先应当减少绘制指令。
我们需要一个ComputeBuffer与材质中的StructuredBuffer对应,并且需要找到这个StructuredBuffer,故定义:
private ComputeBuffer buffer;
private static readonly int matricesID = Shader.PropertyToID("_Matrices");
由于我们需要cnt个缓冲区,每个缓冲区都是一个float4x4的大小,所以在OnEnable方法中初始化:
buffer = new ComputeBuffer(cnt, 64);
buffer应当及时清理,所以定义OnDisable方法并释放空间:
private void OnDisable()
{
    buffer?.Release();
    buffer = null;
}
在Update方法中找到:
Graphics.DrawMesh(mesh, matrices[i], mat, 0);
将其删除,在for循环外添加以下语句:
buffer.SetData(matrices);
mat.SetBuffer(matricesID, buffer);
Graphics.DrawMeshInstanced(mesh, mesh.subMeshCount - 1, mat, matrices);
保存脚本,让我们看看接下来会发生什么:
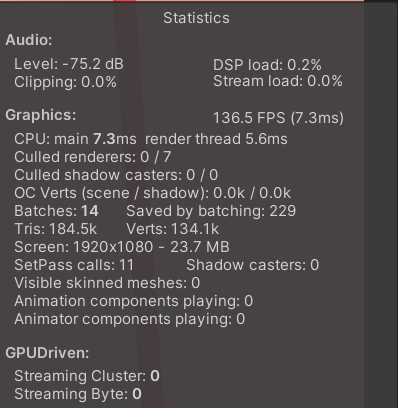
Batches瞬间下降至14,而帧率跃升到136左右!
使用Jobs替代for循环
Jobs不支持简单的数组,取而代之的是NativeArray,我们需要将for循环中用到的数组全部替换成NativeArray:
//private Vector3[] pos;
//private Vector3[] scales;
//private Matrix4x4[] matrices;
private NativeArray<Vector3> pos;
private NativeArray<Vector3> scales;
private NativeArray<Matrix4x4> matrices;
修改OnEnable中的初始化:
//pos = new Vector3[cnt];
//scales = new Vector3[cnt];
//matrices = new Matrix4x4[cnt];
pos = new NativeArray<Vector3>(cnt, Allocator.Persistent);
scales = new NativeArray<Vector3>(cnt, Allocator.Persistent);
matrices = new NativeArray<Matrix4x4>(cnt, Allocator.Persistent);
NativeArray需要及时释放空间,故应在OnDisable中添加:
pos.Dispose();
scales.Dispose();
matrices.Dispose();
在Update中修改Graphics.DrawMeshInstanced方法中的参数:
//Graphics.DrawMeshInstanced(mesh, mesh.subMeshCount - 1, mat, matrices);
Graphics.DrawMeshInstanced(mesh, mesh.subMeshCount - 1, mat, matrices.ToArray());
定义继承自IJobFor的结构体:
- 将Update中计算每个粒子位置的for循环改写为Execute方法。
- 定义Execute方法中需要用到的参数。
- 使用ReadOnly、WriteOnly特性优化结构体中NativeArray读写速度。
public struct Move : IJobFor
{
    public Vector2 orient;
    public float velocity;
    public float deltaTime;
    public Quaternion rotation;
    public NativeArray<Vector3> pos;
    [ReadOnly]
    public NativeArray<Vector3> scales;
    [WriteOnly]
    public NativeArray<Matrix4x4> matrices;
    public void Execute(int i)
    {
        pos[i] += deltaTime * velocity * (Vector3)orient;
        matrices[i] = Matrix4x4.TRS(pos[i], rotation, scales[i]);
    }
}
在Update中使用Jobs替换for循环:
//for (int i = 0; i < cnt; ++i)
//{
//    pos[i] += Time.deltaTime * velocity * (Vector3)orient;
//    matrices[i] = Matrix4x4.TRS(pos[i], transform.rotation, scales[i]);
//}
new Move()
{
    orient = orient,
    velocity = velocity,
    deltaTime = Time.deltaTime,
    rotation = transform.rotation,
    pos = pos,
    scales = scales,
    matrices = matrices,
}.Schedule(cnt, default).Complete();
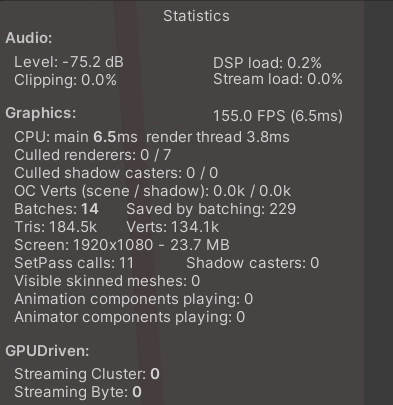
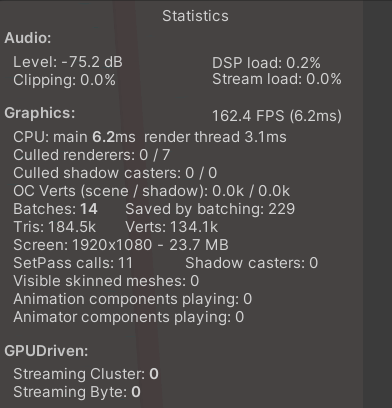
此时的帧率达到了155左右!
使用Burst编译
在Move的定义前添加:
[BurstCompile(CompileSynchronously = true)]
此时的帧率达到了160以上!
参考